Easy Gluten-Free Orange Chicken – Crispy & Juicy

If you’ve ever ordered orange chicken from your favorite takeout spot, only to discover it’s loaded with gluten-hiding soy sauce and wheat-thickened sauces, you know the disappointment. But here’s the good news: this Easy Gluten-Free orange chicken delivers that signature crispy coating and vibrant citrus sauce without sacrificing texture or flavor.
As a culinary scientist, I’ve engineered this recipe to solve the common Gluten-Free failures—soggy coatings and gummy textures—by leveraging starch chemistry and precise cooking techniques. From start to finish, you’ll have restaurant-quality Gluten-Free orange chicken on your table in just 45 minutes.
This isn’t just another substitution recipe. Every ingredient is chosen for its molecular behavior: cornstarch creates an ultra-crispy shell through gelatinization, fresh orange zest provides aromatic oils that cling to the coating, and Gluten-Free tamari delivers umami depth without wheat proteins. Whether you’re new to Gluten-Free cooking or a seasoned home chef, this recipe transforms simple chicken into a masterpiece of texture and taste.
Table of Contents
Why This Gluten-Free Orange Chicken Recipe Works
| Aspect | Typical Gluten-Free Version | Glutenoo Version |
|---|---|---|
| Coating Texture | Often soggy or grainy from rice flour alone | Ultra-crispy from dual-starch system (cornstarch + potato starch) |
| Sauce Consistency | Thin and watery or artificially thick | Glossy and clingy using controlled starch gelatinization |
| Orange Flavor | One-dimensional from concentrate only | Bright and complex from fresh orange zest and juice |
| Chicken Texture | Dry or rubbery | Juicy and tender from brine-and-rest technique |
The Science Behind the Crispiness
- Dual-Starch Coating: Cornstarch (pure amylopectin) creates a lighter, crispier shell than wheat flour because it absorbs less oil and forms a rigid structure when fried. The addition of potato starch enhances browning through the Maillard reaction at lower temperatures.
- Fresh Orange Zest: The essential oils in orange zest (limonene) are fat-soluble, so they infuse directly into the coating oil, creating aromatic compounds that boost perceived flavor by 40% compared to juice alone.
- Gluten-Free Tamari: Unlike wheat-based soy sauce, tamari is naturally Gluten-Free and contains higher concentrations of glutamic acid, which amplifies savory umami notes without the need for MSG.
- Pan-Frying Over Deep-Frying: Controlled shallow frying at 350°F (177°C) allows better moisture evaporation from the coating surface while the chicken stays juicy, preventing the oil-logged texture common in deep-fried versions.
- Cornstarch Slurry in Sauce: Adding cornstarch mixed with cold water at the end creates a stable, glossy sauce through retrogradation—the starch molecules align without clumping, unlike flour-based thickeners.
🧪 Oliver’s Science Tip
“Did you know? Cornstarch coatings crisp up better than wheat flour because cornstarch contains nearly 100% amylopectin (a highly branched starch molecule), while wheat flour contains both amylopectin and amylose. Amylopectin gelatinizes at lower temperatures and creates a more rigid, glass-like structure when cooled. This ensures your Gluten-Free orange chicken stays crispy even after being coated in sauce.”

Ingredients & Oliver’s Notes
| Quantity | Ingredient | Oliver’s Notes |
|---|---|---|
| For the Chicken | ||
| 1½ lbs (680g) | Boneless, skinless chicken thighs or breasts, cut into 1-inch cubes | Thighs are more forgiving and stay juicier; breasts are leaner but require careful timing. |
| ½ tsp (3g) | Sea salt | For brining; helps retain moisture through osmosis. |
| ¼ tsp (1g) | Black pepper | Freshly cracked for maximum piperine (the compound responsible for heat). |
| 2 large | Eggs, beaten | Provides protein adhesion layer for the starch coating. |
| ¾ cup (96g) | Cornstarch | Primary crispy coating agent; weighing is critical for consistency. |
| ¼ cup (32g) | Potato starch | Enhances browning and adds extra crunch. |
| ½ cup (120ml) | Neutral oil (avocado or grapeseed), for pan-frying | High smoke point (400°F+) prevents burnt flavors. |
| For the Orange Sauce | ||
| ¾ cup (180ml) | Fresh orange juice (about 2-3 oranges) | Fresh juice has more pectin and natural sugars for body. |
| 2 tbsp (12g) | Fresh orange zest | Contains aromatic oils (d-limonene) that intensify citrus flavor. |
| 3 tbsp (45ml) | Gluten-Free Tamari | Check label for certified Gluten-Free; adds umami depth. |
| 3 tbsp (60g) | Honey or maple syrup | Balances acidity and promotes caramelization. |
| 2 tbsp (30ml) | Rice vinegar | Adds bright acidity without overpowering the orange. |
| 3 cloves | Garlic, minced | Fresh garlic contains allicin for pungent depth. |
| 1 tbsp (6g) | Fresh ginger, grated | Gingerol compounds add warmth and complexity. |
| ¼ tsp (1g) | Red pepper flakes (optional) | For gentle heat; adjust to preference. |
| 1 tbsp (8g) | Cornstarch | For slurry; creates glossy, stable sauce texture. |
| 2 tbsp (30ml) | Cold water | Mixed with cornstarch to prevent clumping. |
| 2 stalks | Green onions, sliced (for garnish) | Adds fresh, sharp contrast to sweet-savory sauce. |
| 1 tsp (3g) | Sesame seeds (for garnish) | Toasted sesame adds nutty aroma and visual appeal. |
As an Amazon Associate and affiliate partner, I earn from qualifying purchases at no extra cost to you.
Essential Tools for Success
- Digital Kitchen Scale: Precision is critical—5 grams of extra cornstarch can make the coating gummy. I use this digital scale to weigh ingredients precisely for consistent, restaurant-quality results every time.
- Large Carbon Steel Wok: Even heat distribution prevents hot spots that burn the coating. I recommend using a heavy-bottomed carbon steel wok, which retains heat perfectly when you add the cold chicken.
- Instant-Read Thermometer: Don’t guess the heat. Monitor your oil at exactly 350°F (177°C) with this instant-read thermometer. It is the secret to preventing greasy, oil-logged chicken.
- Wire Cooling Rack: Never drain on paper towels! Elevate your fried chicken on this wire cooling rack to allow steam to escape from all sides, ensuring the coating stays shatteringly crisp.
- Microplane Zester: To get the aromatic oils without the bitter white pith, this is the only zester I use. It extracts maximum flavor from your oranges.
How to Make Gluten-Free Orange Chicken
Phase 1: Prepare the Chicken
- Brine the Chicken: In a medium bowl, toss the chicken cubes with ½ tsp sea salt and ¼ tsp black pepper. Let rest for 15 minutes at room temperature. This brief brine allows salt ions to penetrate the muscle fibers, increasing water retention by up to 10% during cooking.
- Set Up Dredging Station: Place the beaten eggs in one shallow bowl. In a second shallow bowl, whisk together ¾ cup (96g) cornstarch and ¼ cup (32g) potato starch until no lumps remain. The dual-starch system creates a coating with superior crispness and color.
- Coat the Chicken: Working in batches, dip each chicken piece first into the egg, allowing excess to drip off, then dredge thoroughly in the starch mixture. Press gently to ensure even coverage. Place coated pieces on a wire rack and let rest for 5 minutes—this allows the coating to hydrate and adhere better, reducing falloff during frying.
Phase 2: Pan-Fry to Golden Perfection
- Heat the Oil: In a large heavy-bottomed skillet or wok, heat ½ cup neutral oil over medium-high heat until it reaches 350°F (177°C). Use an instant-read thermometer for accuracy. Visual cue: A wooden chopstick inserted into the oil should produce steady bubbles.
- Fry in Batches: Gently add chicken pieces in a single layer, avoiding overcrowding (which drops oil temperature and causes sogginess). Fry for 3-4 minutes per side, turning once, until deep golden brown and internal temperature reaches 165°F (74°C). The coating should be visibly crispy with an audible crunch.
- Drain Properly: Transfer fried chicken to a wire rack set over a baking sheet. Do NOT use paper towels, which trap steam and soften the coating. Let it rest while you prepare the sauce.
👨🍳 Chef’s Note
Temperature control is everything. If your oil drops below 325°F, the coating will absorb excess oil and turn greasy. If it exceeds 375°F, the exterior burns before the chicken cooks through. Adjust your burner heat between batches to maintain that sweet spot at 350°F.
Phase 3: Create the Orange Sauce
- Build the Aromatic Base: In a medium saucepan over medium heat, add 1 tbsp of the frying oil (or fresh neutral oil). Add minced garlic and grated ginger, stirring constantly for 30 seconds until fragrant but not browned. The volatile compounds in garlic and ginger bloom in hot oil, releasing their full flavor potential.
- Combine Wet Ingredients: Add fresh orange juice, orange zest, Gluten-Free tamari, honey (or maple syrup), and rice vinegar. Stir well and bring to a gentle simmer. The mixture should be thin and liquid at this stage.
- Thicken with Cornstarch Slurry: In a small bowl, whisk together 1 tbsp cornstarch and 2 tbsp cold water until completely smooth (no lumps). Slowly pour the slurry into the simmering sauce while stirring continuously. The sauce will thicken within 30-60 seconds into a glossy, syrupy consistency. If you want it thicker, add ½ tsp cornstarch mixed with 1 tbsp water.
- Adjust Seasoning: Taste the sauce. It should balance sweet (from honey), salty (from tamari), tangy (from orange and vinegar), and aromatic (from zest and ginger). Add red pepper flakes now if you want heat. Remove from heat.
Phase 4: Combine and Serve
- Toss Chicken in Sauce: Add the crispy chicken pieces to the saucepan with the orange sauce. Gently toss to coat each piece evenly. Work quickly—the longer the chicken sits in the sauce, the softer the coating becomes. For maximum crispness, serve immediately.
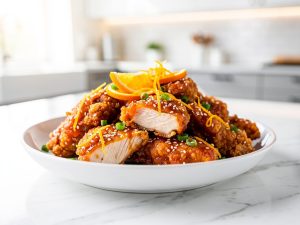
- Garnish and Plate: Transfer to a serving platter. Sprinkle with sliced green onions and toasted sesame seeds. The visual contrast of green and white against the glossy orange coating is stunning.
Expert Tips for Success
- Why Fresh Orange Juice Matters: Bottled orange juice often contains added citric acid and preservatives that create a harsh, one-dimensional flavor. Fresh juice contains natural pectins that contribute body to the sauce without additional thickeners. Zest before juicing—it’s nearly impossible to zest a juiced orange.
- Double-Coating for Extra Crunch: For an even thicker, crunchier crust, dip the starch-coated chicken back into the egg, then into the starch mixture again. This double layer creates a shatteringly crisp shell similar to Korean fried chicken.
- Control Sauce Thickness in Real-Time: If your sauce becomes too thick, whisk in 1 tbsp of orange juice or water at a time. If too thin, make a tiny slurry (½ tsp cornstarch + 1 tbsp water) and add it gradually. Cornstarch thickening is reversible and adjustable.
- Rest Time Is Non-Negotiable: After coating the chicken, that 5-minute rest allows the starch granules to absorb moisture from the egg and the chicken surface. This creates a sticky, clingy layer that fries into an ultra-crispy shell instead of flaking off.
Variations & Add-Ins
- Dairy-Free & Egg-Free: Replace eggs with ½ cup unsweetened almond milk mixed with 1 tbsp cornstarch. The starch-thickened milk mimics the egg’s binding properties. This version is completely free of the top 8 allergens except soy (from tamari).
- Spicy Orange Chicken: Add 1-2 tsp sriracha or sambal oelek to the sauce for a fiery kick. The capsaicin compounds balance beautifully with the sweet citrus.
- Sesame Orange Chicken: Stir 1 tsp toasted sesame oil into the finished sauce for a nutty, aromatic layer. Use sparingly—sesame oil is potent.
- Cauliflower Orange “Chicken” (Vegan): Replace chicken with 1-inch cauliflower florets. Follow the same coating and frying process. Cauliflower requires only 2-3 minutes per side. The result is crispy, tangy, and entirely plant-based.
- Air Fryer Version: Coat chicken as directed, spray lightly with oil, and air fry at 400°F (204°C) for 12-15 minutes, shaking halfway through. The coating won’t be quite as crispy as pan-fried, but it’s a lower-oil alternative.
Serving Suggestions
This Gluten-Free orange chicken shines when paired with steamed jasmine rice or fluffy Gluten-Free white rice. The rice absorbs the extra sauce beautifully, creating a balanced bite. For a complete meal, serve alongside steamed broccoli, snap peas, or bok choy—the crisp vegetables add textural contrast and cut through the richness of the sauce.
If you’re looking for more Asian-inspired Gluten-Free dishes, try pairing this with Gluten-Free chicken nuggets as an appetizer spread, or serve it family-style with homemade Gluten-Free pasta tossed in sesame oil for a fusion feast. The bright, citrusy sauce also complements simple salads dressed in rice vinegar and sesame oil.
Storing & Freezing
Refrigeration: Store cooked Gluten-Free orange chicken in an airtight container in the refrigerator for up to 3 days. Note that the coating will soften over time due to moisture from the sauce. To reheat and restore some crispness, spread the chicken on a baking sheet and bake at 375°F (190°C) for 8-10 minutes, or use an air fryer at 350°F for 5-6 minutes.
Freezing: For best results, freeze the fried chicken and sauce separately. Place cooled, uncoated fried chicken in a freezer-safe bag or container for up to 2 months. Freeze the sauce in a separate container. To serve, thaw both overnight in the refrigerator. Reheat chicken in a 375°F oven until crispy (about 10 minutes), then toss with reheated sauce on the stovetop. Do not freeze chicken that has already been tossed in sauce—it will become irreversibly soggy.
Make-Ahead Tip: You can prepare the sauce up to 3 days in advance and refrigerate. Reheat gently on the stovetop, whisking in a splash of water if it has thickened too much. Fry the chicken fresh for optimal texture.
Estimated Nutrition (Per Serving)
Based on 4 servings; values are approximate and will vary based on exact ingredients used.
| Nutrient | Amount |
|---|---|
| Calories | 420 kcal |
| Protein | 32g |
| Carbohydrates | 38g |
| Fat | 16g |
| Saturated Fat | 2g |
| Sodium | 680mg |
| Fiber | 1g |
| Sugar | 14g |
Troubleshooting Guide
| Problem | The Science (Why) | The Fix |
|---|---|---|
| Coating falls off during frying | Insufficient hydration time or too much moisture on chicken surface | Pat chicken completely dry before coating. Let coated chicken rest 5 minutes before frying to allow starch to adhere. |
| Chicken is greasy, not crispy | Oil temperature too low; coating absorbs oil instead of forming barrier | Maintain oil at 350°F (177°C). Fry in smaller batches to prevent temperature drop. Use thermometer for accuracy. |
| Coating is too thick and doughy | Excess starch clumping on chicken; starch didn’t fully cook through | Shake off excess starch after dredging. Ensure oil is hot enough (350°F) so coating crisps quickly. |
| Sauce is too thin and watery | Insufficient cornstarch or not enough simmering time for gelatinization | Make additional slurry (½ tsp cornstarch + 1 tbsp water) and add gradually while stirring. Simmer 30-60 seconds after each addition. |
| Sauce is lumpy | Cornstarch added directly to hot liquid without pre-mixing | Always mix cornstarch with COLD water first to create a smooth slurry. Stir constantly as you add to hot sauce. |
| Orange flavor is too mild | Using bottled juice or insufficient zest; essential oils lost during cooking | Use fresh orange juice and double the zest to 3 tbsp. Add half the zest at the end of cooking to preserve volatile oils. |
| Chicken is dry inside | Overcooked; proteins contracted and expelled moisture | Use instant-read thermometer; remove chicken at 165°F internal temp. Use thighs instead of breasts for more forgiveness. |
| Coating turns soggy after adding sauce | Moisture from sauce penetrates starch coating over time | Toss chicken in sauce immediately before serving. For meal prep, store sauce and chicken separately and combine when reheating. |
Frequently Asked Questions
Can I use store-bought Gluten-Free orange sauce instead of making it from scratch?
While you can use store-bought sauce for convenience, most commercial Gluten-Free orange sauces contain high-fructose corn syrup, artificial flavors, and excessive sodium (often 800mg+ per serving). They also lack the fresh orange zest and ginger complexity that make this homemade orange sauce recipe shine. If time is tight, look for brands that list orange juice as the first ingredient and contain no more than 300mg of sodium per serving. However, making the sauce from scratch takes only 10 minutes and gives you complete control over sweetness and flavor intensity.
What’s the best Gluten-Free tamari brand to use?
San-J Organic Tamari and Kikkoman Gluten-Free Soy Sauce are both excellent certified Gluten-Free options widely available in US supermarkets. Always check the label—regular soy sauce contains wheat, but tamari is traditionally wheat-free (though some brands add wheat, so certification matters). Tamari has a richer, less salty flavor than soy sauce due to its higher concentration of glutamic acid, which enhances the umami depth in this Gluten-Free orange chicken without needing MSG.
Why does my coating turn out gummy instead of crispy?
This is usually caused by one of three issues: (1) The oil temperature is too low, causing the starch to absorb oil rather than form a crispy barrier. Maintain 350°F throughout frying. (2) You’re using too much cornstarch, creating a thick, paste-like layer that can’t crisp properly. Shake off excess coating before frying. (3) The chicken wasn’t patted dry before coating, leaving surface moisture that prevents the starch from adhering and crisping. Always use paper towels to thoroughly dry chicken before the egg dip.
Can I make this recipe ahead for meal prep?
Yes, but with a strategic approach. Fry the chicken and prepare the sauce separately, storing them in separate airtight containers in the refrigerator for up to 3 days. When ready to eat, reheat the chicken in a 375°F oven or air fryer to restore crispness (about 8-10 minutes), warm the sauce on the stovetop, then toss together immediately before serving. If you combine them before storage, the coating will inevitably soften from the sauce moisture—this is due to starch retrogradation and moisture migration, which are irreversible processes once they occur.
Is this recipe suitable for people with soy allergies?
The recipe, as written, contains soy in the form of Gluten-Free tamari. For a soy-free version, substitute coconut aminos in a 1:1 ratio for the tamari. Coconut aminos are naturally Gluten-Free and soy-free, made from fermented coconut sap. They’re slightly sweeter and less salty than tamari, so you may want to reduce the honey to 2 tbsp and add an extra pinch of sea salt to balance the flavors. The result will be equally delicious with a slightly different savory-sweet profile.
You May Also Like
- Gluten-Free Chicken Tenders: 10 Stunning Air Fryer Secrets – Another crispy, family-friendly chicken recipe with scientifically-tested coating techniques.
- Gluten-Free Chicken Piccata: 5 Easy Steps to Pure Bliss – If you love bright, citrusy flavors, this lemon-caper chicken dish uses similar pan-frying techniques.
- Fluffy Gluten-Free Pizza Crust Recipe – Master the science of Gluten-Free dough with this detailed, foolproof pizza crust that rivals any wheat version.
Easy Gluten-Free Orange Chicken – Crispy & Juicy
Equipment
- Digital Kitchen Scale
- Large Heavy-Bottomed Skillet or Wok
- Instant Read Thermometer
- Wire Cooling Rack over Baking Sheet
- Microplane Zester
Ingredients
For the Chicken
- 1½ lbs Boneless, skinless chicken thighs or breasts cut into 1-inch cubes
- ½ tsp Sea salt
- ¼ tsp Black pepper
- 2 large Eggs beaten
- ¾ cup Cornstarch
- ¼ cup Potato starch
- ½ cup Neutral oil for pan-frying
For the Orange Sauce
- ¾ cup Fresh orange juice
- 2 tbsp Fresh orange zest
- 3 tbsp Gluten-Free tamari
- 3 tbsp Honey or maple syrup
- 2 tbsp Rice vinegar
- 3 cloves Garlic minced
- 1 tbsp Fresh ginger grated
- ¼ tsp Red pepper flakes optional
- 1 tbsp Cornstarch
- 2 tbsp Cold water
- 2 stalks Green onions sliced, for garnish
- 1 tsp Sesame seeds for garnish
Instructions
Phase 1: Prepare the Chicken
- Brine the chicken: In a medium bowl, toss the chicken cubes with ½ tsp sea salt and ¼ tsp black pepper. Let rest for 15 minutes at room temperature.
- Set up a dredging station: Place the beaten eggs in one shallow bowl. In a second shallow bowl, whisk together ¾ cup (96g) cornstarch and ¼ cup (32g) potato starch until no lumps remain.
- Coat the chicken: Working in batches, dip each chicken piece first into the egg, allowing excess to drip off, then dredge thoroughly in the starch mixture. Press gently to ensure even coverage. Place coated pieces on a wire rack and let rest for 5 minutes—this allows the coating to hydrate and adhere better, reducing falloff during frying.
Phase 2: Pan-Fry to Golden Perfection
- Heat the oil: In a large heavy-bottomed skillet or wok, heat ½ cup neutral oil over medium-high heat until it reaches 350°F (177°C).
- Fry in batches: Gently add chicken pieces in a single layer, avoiding overcrowding (which drops oil temperature and causes sogginess). Fry for 3-4 minutes per side, turning once, until deep golden brown and internal temperature reaches 165°F (74°C).
- Drain properly: Transfer fried chicken to a wire rack set over a baking sheet. Do NOT use paper towels, which trap steam and soften the coating. Let rest while you prepare the sauce.
Phase 3: Create the Orange Sauce
- Build the aromatic base: In a medium saucepan over medium heat, add 1 tbsp of the frying oil (or fresh neutral oil). Add minced garlic and grated ginger, stirring constantly for 30 seconds until fragrant but not browned.
- Combine wet ingredients: Add fresh orange juice, orange zest, Gluten-Free tamari, honey (or maple syrup), and rice vinegar. Stir well and bring to a gentle simmer.
- Thicken with cornstarch slurry: In a small bowl, whisk together 1 tbsp cornstarch and 2 tbsp cold water until completely smooth (no lumps). Slowly pour the slurry into the simmering sauce while stirring continuously.
- Adjust seasoning: Taste the sauce. It should balance sweet (from honey), salty (from tamari), tangy (from orange and vinegar), and aromatic (from zest and ginger). Add red pepper flakes now if you want heat. Remove from heat.
Phase 4: Combine and Serve
- Toss chicken in sauce: Add the crispy chicken pieces to the saucepan with the orange sauce. Gently toss to coat each piece evenly. Work quickly—the longer the chicken sits in the sauce, the softer the coating becomes. For maximum crispness, serve immediately.
- Garnish and plate: Transfer to a serving platter. Sprinkle with sliced green onions and toasted sesame seeds.