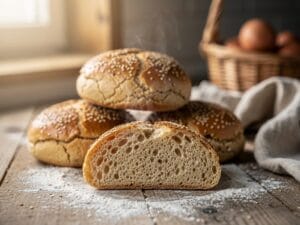
Homemade Gluten-Free Hamburger Buns
Tired of crumbly, bland gluten-free buns? This master recipe delivers soft, pliable, and delicious homemade buns that hold up to any burger, ready in under 2 hours.
Equipment
- Digital Kitchen Scale
- Stand Mixer with Paddle Attachment
- Large mixing bowl
- Baking Sheet with Parchment Paper
- Pastry Scraper or Spatula
- Instant Read Thermometer
Ingredients
Main Ingredients
- 1 ¼ cups (300ml) Warm Water (105-115°F or 40-46°C) – critical for yeast activation.
- 2 ¼ tsp (7g) Active Dry Yeast One standard packet. Ensure it's fresh!
- 1 tbsp (15g) Granulated Sugar Feeds the yeast and adds a hint of sweetness.
- 2 cups (280g) Gluten-Free All-Purpose Flour Blend Look for a blend with xanthan gum. (Bob's Red Mill 1-to-1 or King Arthur Measure for Measure work well).
- ¼ cup (30g) Tapioca Starch Adds chewiness and elasticity. No direct substitute.
- ¼ cup (20g) Psyllium Husk Powder Crucial for texture. Do NOT skip or substitute.
- 1 ½ tsp (9g) Fine Sea Salt Balances flavor; don't use coarse salt.
- 2 tbsp (28g) Olive Oil (or melted unsalted butter) Adds richness and tenderness. For dairy-free, stick with oil.
- 1 Large Egg Adds structure, richness, and aids in browning. For egg-free, use a flax egg (1 tbsp ground flaxseed + 3 tbsp water, let sit 5 mins).
- 1 tsp Apple Cider Vinegar Acts as a leavening booster and helps create a tender crumb.
- 1 Large Egg Optional, for egg wash (with 1 tbsp water).
- Optional Sesame Seeds For golden tops and classic burger bun aesthetic.
Instructions
Main Instructions
Phase 1: Activate the Yeast1.
- In the bowl of your stand mixer, combine the warm water (105-115°F), granulated sugar, and active dry yeast. Gently stir to combine. Let this mixture sit for 5-10 minutes, until it becomes foamy and bubbly. This indicates your yeast is alive and active. If it doesn't foam, your yeast is likely expired, or your water was too hot/cold; start over.
Phase 2: Prepare the Dry Ingredients.
- In a separate large bowl, whisk together the gluten-free all-purpose flour blend, tapioca starch, psyllium husk powder, and fine sea salt until thoroughly combined. This ensures even distribution of all ingredients.
Phase 3: Mix the Dough.
- Add the olive oil (or melted butter), egg, and apple cider vinegar to the activated yeast mixture in the stand mixer bowl. Mix on low speed using the paddle attachment until just combined.Gradually add the dry ingredient mixture to the wet ingredients in the stand mixer bowl, mixing on low speed. Once all dry ingredients are added, increase the speed to medium-high and beat for 5-7 minutes. Chef's Note: The dough will be very wet and sticky, more like a thick batter than traditional bread dough. Do NOT be tempted to add more flour! This high hydration is essential for soft, pliable gluten-free buns. Trust the process.
Phase 4: Shape the Buns
- Lightly grease your hands or a pastry scraper. Line a baking sheet with parchment paper. Using an ice cream scoop (about ¼ cup capacity) or your greased hands, divide the dough into 6 equal portions.Gently shape each portion into a round bun on the prepared baking sheet. It helps to gently press the dough against the parchment paper to create a smooth surface. Aim for buns about 3-3.5 inches in diameter and leave at least 2 inches between them.
Phase 5: Proofing and Baking.
- Loosely cover the shaped buns with a clean kitchen towel or plastic wrap (lightly oiled to prevent sticking).10. Let the buns proof in a warm, draft-free place for 30-45 minutes, or until they have noticeably increased in size by about 50%. This can be a turned-off oven with the light on, or near a warm window. While the buns are proofing, preheat your oven to 375°F (190°C).12. If desired, whisk one egg with 1 tablespoon of water for an egg wash. Gently brush the tops of the proofed buns with the egg wash and sprinkle with sesame seeds. Bake for 20-25 minutes, or until the buns are golden brown and sound hollow when tapped on the bottom. An instant-read thermometer inserted into the center of a bun should read 205-210°F (96-99°C) for optimal doneness. Remove the buns from the oven and immediately transfer them to a wire rack to cool completely before slicing and serving. Cooling completely is crucial for gluten-free bread to set its structure.
