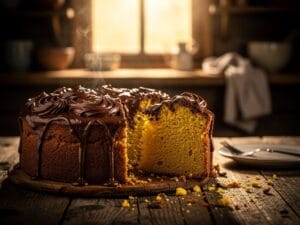
Fluffy Gluten Free Yellow Cake with Chocolate Frosting
Gluten-free yellow cake
Equipment
- Digital Kitchen Scale Non-negotiable for gluten-free precision. Flour volume can vary by 20%.
- Stand Mixer or Hand Mixer Proper aeration requires consistent speed control.
- Two 9-inch Round Cake Pans For layer cake. Or one 9x13-inch pan for sheet cake.
- Parchment paper Line pans to prevent sticking (GF cakes are delicate).
- Offset Spatula Forsmooth, professional frosting application.
Ingredients
Main Ingredients
- 2½ cups (300g) Gluten-free flour blend with xanthan gum
- 1¾ cups (350g) Granulated sugar
- ¾ cups (170g) Unsalted butter, room temp
- ½ cups (120ml) Neutral oil
- 4 Large Eggs, room temperature
- 1 cups (240ml) Buttermilk, room temperature
- 2 tsp Pure vanilla extract
- 2 tsp Baking powder
- ½ tsp Baking soda
- ¾ tsp Fine sea salt
- 1 cup (226g) Unsalted butter, room temp for frosting
- 3½ cups (420g) Powdered sugar, sifted
- ¾ cups (75g) Dutch-process cocoa powder
- ⅓ cups (80ml) Heavy cream
- 2 tsp Pure vanilla extract for frosting
- ¼ tsp Fine sea salt for frosting
Instructions
Preparation
- Preheat your oven to 350°F (175°C). Position the rack in the center.
- Grease two 9-inch round pans with butter or non-stick spray. Line the bottoms with parchment rounds. Dust lightly with gluten-free flour blend and tap out excess.
- Let eggs, butter, and buttermilk sit at room temperature for 30 minutes. This is critical for emulsification.
Combine Dry Ingredients
- In a large bowl, whisk together the gluten-free baking flour blend, baking powder, baking soda, and salt. Set aside.
Cream Butter and Sugar
- In the bowl of a stand mixer fitted with the paddle attachment (or using a hand mixer), beat the room-temperature butter and granulated sugar on medium-high speed for 3-4 minutes, until pale and fluffy. Scrape down the sides halfway through.
- Add the eggs one at a time, beating well after each addition (about 30 seconds). The mixture should look thick and glossy.
- Beat in the vanilla extract and oil until fully incorporated.
Alternate Wet and Dry
- With the mixer on low speed, add the flour mixture in three additions, alternating with the buttermilk in two additions. Begin and end with flour. Mix just until no streaks remain—do not overmix. Overmixing activates xanthan gum excessively, leading to gumminess.
- The batter should be thick but pourable, like pancake batter. If it's too stiff, add 1-2 tablespoons of buttermilk.
Bake
- Divide the batter evenly between the prepared pans (use a scale for precision: approximately 580g per pan).
- Bake for 28-32 minutes, or until a toothpick inserted in the center comes out with a few moist crumbs (not wet batter). The tops should spring back when gently pressed.
- Cool in pans on a wire rack for 15 minutes, then turn out onto the rack to cool completely (about 1 hour). Do not frost a warm cake—it will melt.
Make Chocolate Buttercream Frosting
- In a stand mixer, beat the room-temperature butter on medium speed for 2 minutes until creamy.
- Sift together the powdered sugar and cocoa powder. Add to the butter in three additions, beating on low speed after each to prevent a sugar cloud.
- Add the heavy cream, vanilla extract, and salt. Increase speed to medium-high and beat for 3-4 minutes, until light and fluffy. If too thick, add cream 1 tablespoon at a time. If too thin, add more powdered sugar (¼ cup increments).
Assemble Layer Cake
- Place one cake layer on a serving plate. Spread about 1 cup of chocolate frosting evenly on top using an offset spatula.
- Place the second layer on top, pressing gently. Apply a thin "crumb coat" of frosting over the entire cake to seal in crumbs. Refrigerate for 15 minutes.
- Apply the final coat of frosting, smoothing with the spatula. Decorate as desired (I recommend a simple swirl pattern for elegance).
